Quick tips are random posts regarding something I discovered on my way to something bigger. They usually get longer than “quick” would imply, for which I refuse to apologize.
I’ve answered some questions about my own experience with creating screencasts recently. I’m not by any means the most prolific screencaster in the community, but I learned a lot creating 60 Tips with David Sparks for the iBookstore, and creating my own screencasts for Marked 2 and my blog. It seemed like the kind of info that might be of use to the world.
Many of these tips focus on my tool of choice, ScreenFlow. I’m currently using ScreenFlow 5.0.3, but a lot of these concepts can be easily ported to other applications with minor technical adjustments. There are a lot of options, from QuickTime Player to Camtasia (and many inexpensive options on the Mac App Store), but ScreenFlow’s editing capabilities are top notch and perfect for anyone doing more than just a quick screen share.
Setup
A bit of preparation goes a long way.
Scripting
I’ve tried everything from “winging it” to writing out a full script to read as I record. The best solution for me is in between. I currently outline a screencast, listing sections and major points to hit. While I’m recording, the list stays either on another display from the recording screen or on my iPad in front of me. Between each concept I’m recording, I pause and reference the list, ensuring I’ve covered the necessary points and running through what I’m going to do for the next section. I’ve learned to record ‘casts in one long take, which I’ll get to in a bit.
If you do want to script your screencast, it can help prevent any nervous jitters and keep things moving. That’s more ideal for recording promo videos than doing how-tos, but it’s called for on occasion. Doing a dry run and then transcribing the result to use for a smoothed-out second take can be useful. In this case, you’ll want to use a teleprompter application of some sort. There are some options for iPad, which makes a good solution for single-display work, but if you have a second monitor (or use something like Duet), Marked 2 is a very good alternative to the oddly expensive Mac teleprompter solutions.
Resolution
In most cases—regardless of your intended output resolution—leave your desktop resolution just as it would normally be. If your primary display is, say, a 27” high-resolution display and need to show your entire desktop at once, you may want to change the display resolution to something that will compress the visible area a bit. Using ScreenFlow, though, I find that zooming in on areas of interest is more effective than having everything static and full-size.
iBooks recommends exporting at 640x480, so if your output is intended for the iBookstore, keep in mind that the aspect ratio of your final recording is going to be 4:3, and that may affect the desired size of the windows you record even if it doesn’t change the needs of the display format.
Intro slides
You can get crazy doing intros in Motion, which you can export as movies and just import into your screencast project. Most screencast projects don’t require that level of detail, though.
You can easily create motion-based intro slides using Keynote, export a QuickTime and import in the same fashion. You can also just develop a series of static images as needed, and drop them into the timeline. Using ScreenFlow’s text annotation and transition tools, you can add titles that change over your background image without requiring any more trips to an external editor.
Either way, make your slides at the same resolution and size as the recording, keeping in mind any aspect ratio changes that may be required. You don’t want to have to enlarge a graphic or imported movie to fit your editing window as it will degrade image quality.
Recording
Ok, so let’s make the recording process as painless as possible.
Record in One Take
Ok, this is where you’ll save a ton of time. Once you’ve outlined or at least prepared the general plan in your head, just set up the recording, audio input, etc., and start capturing. If you make a mistake, don’t stop the recording, just start that section again after a pause. You’ll cut it out in edit. Any time you get stuck or have to backtrack, just give yourself a breath and dive back in. It’s easier to edit than to keep starting and stopping the recording, plus it does wonders for relieving the pressure of doing everything perfectly.
I’ve learned to always record the voiceover while performing the on-screen actions. If you’re not talking and explaining while mousing around, you’ll almost always move too fast. That results in very rushed voiceovers when you start trying to add audio on top.
Slow Movements
ScreenFlow and other apps allow you to add highlights and annotations in post, one of which is the ability to zoom the area around the mouse cursor. Keep this in mind when moving around the screen. If you pause before clicking a menu item, for example, you can use the cursor zoom to easily highlight the item without having to make any speed changes to the clip.
It’s better to pause than to rush. Pauses can be clipped out in seconds, but a rushed video requires a lot of editing. I’ve learned this the hard way, repeatedly. Slow down!
Visual Markers
To make cutting bad takes easier, you can create visual markers while recording. One way to do this is just to use a pinch out gesture to show desktop, hold it for 2 seconds, and then bring it back before starting the take again. In the overview in the timeline, you’ll see the “blank” part for reference when scrubbing.
You can also use audio markers (clapboard style) and scan for them in the audio overview, but I find visual markers to be the easiest.
Consistent mouse/window position
Another thing to consider when backtracking during a single take is window position, and often mouse cursor position. If you need to cut a section out, you don’t want the window position to jump at the cut, as even with a crossfade it’s still jarring.
The general idea is to never move a window unless it’s being closed. If you do need to, either make the movement part of the recording, or backtrack to a point where the window would open and do that whole take again.
It’s good to get in the habit of always moving the mouse offscreen between actions. Then if you need to backtrack, you can just start at the last point the mouse was offscreen, create the marker, and begin again. It allows seamless edits that don’t have cursor jumps.
In ScreenFlow, you can also “Hide pointer” with a Screen Recording action, which is handy during editing to clip out jumpy mouse movements where you don’t want to (or it doesn’t make sense to) do a crossfade.
Background, Dock, Menu Bar
I generally hide the Dock when recording, unless the screencast subject requires otherwise. I don’t know about other people, but I get very distracted any time there’s an icon in a Dock I don’t recognize in a screencast. Keeping up with the Joneses or something. Additionally, it gives you more screen real estate.
Hiding the menu bar is nice for similar reasons, but don’t sweat trying to do it in the recording. Just keep some empty space around the windows you’re focusing on and when you get to edit, you can just zoom in 10% and crop the screen. You can pan and zoom to any motion that requires a visible menu bar, focusing on the relevant part while using it, then pan back to the window to focus.
Editing
From here on out, we’re pretty much only talking ScreenFlow, so the specifics are probably not useful if you’re editing in something else. Just fair warning.
Editing Audio
Recording audio and video at the same time, as mentioned above, will allow the final product to have perfectly consistent audio and make syncing voiceover tracks take zero time.
If you need to shift on a track, or edit video without changing the audio, ScreenFlow can “detach audio” from the video track and allow it to be edited separately.
If you want to process the audio externally, you can detach the audio, Export->Audio only, edit the resulting file, and then add it back to the project, replacing the detached audio track.
Jason Snell shared an excellent GarageBand preset for podcast/voiceover tracks, by the way, so if you do edit audio in GarageBand, you can just use that patch to instantly improve the sound.
Freeze frame
If you ever need to extend an explanation, you can insert a freeze frame in ScreenFlow and add additional vocal recordings, giving the effect of pausing on screen while you explain what you just did. If you do that just record it in ScreenFlow, turning off screen recording and “add to current project” when you stop. That will help the audio consistency.
Annotations and Actions
Showing keystrokes can be very useful, especially for advanced topics in screencasts. ScreenFlow can do this automatically if you select the clip and turn on Screen Recording->Show Keystrokes in the inspector. You can also add it as a video action to selectively control when keystrokes are shown.
If you use ScreenFlow, you’re probably familiar with all of the highlighting and annotation capabilities. If not, they’re extensive, so check out the help and read up on them.
The “Text annotation” features are flexible, allowing you to control font, color, background, and even transition effects for fading, rippling, zooming, etc.. Using them removes a lot of external image and graphic work you’d otherwise need.
You can also define “Action Templates” for commonly used settings (Actions->Create Template Action…). Make presets for things like turning keystrokes on and off, zooming the pointer with a nice .5s build, etc..
Markers
“Markers” function like bookmarks, and can be a handy feature while editing. You can add markers to either the main timeline or to individual clips. Markers on clips will move along with the clips, markers on the project timeline remain static as clips are edited.
Add a marker to the timeline with the backtick key (\`). Use ⌘⌥\` to add a marker to a selected clip. Once you have some markers, you can easily navigate them with ⇧↑, ⇧↓ (shift up/down).
Ripple Delete
One ScreenFlow technique that I didn’t learn until recently is in/out ripple delete. When you want to remove a bad take or cut a section, navigate to the beginning of it, type “I”, then go to the end and type “O”. Then you can use ⌘⌫ (Command-Delete) to remove the entire section (all tracks), bringing the ends of the surrounding sections together in one step.
Shortcuts
You can use left and right arrow keys to navigate (scrub) the timeline quickly and precisely. Add Shift (⇧) to the arrow keys to move the playhead in larger increments.
For efficiency and accuracy when navigating the timeline for edits, zoom into the timeline and use the arrow keys to scrub. - and = will zoom incrementally, and you can use ⌃T to zoom out to fit the timeline in the visible area.
In System Preferences I added keyboard shortcuts for previous/next frame. This allows me to move the playhead even when a clip is focused in the editor instead of the timeline, otherwise the regular arrow keys will nudge the clip instead of the playhead. This is handy even with just a keyboard. On my ShuttleXpress, I use them on the jog wheel for stepping through the timeline frame-by-frame.
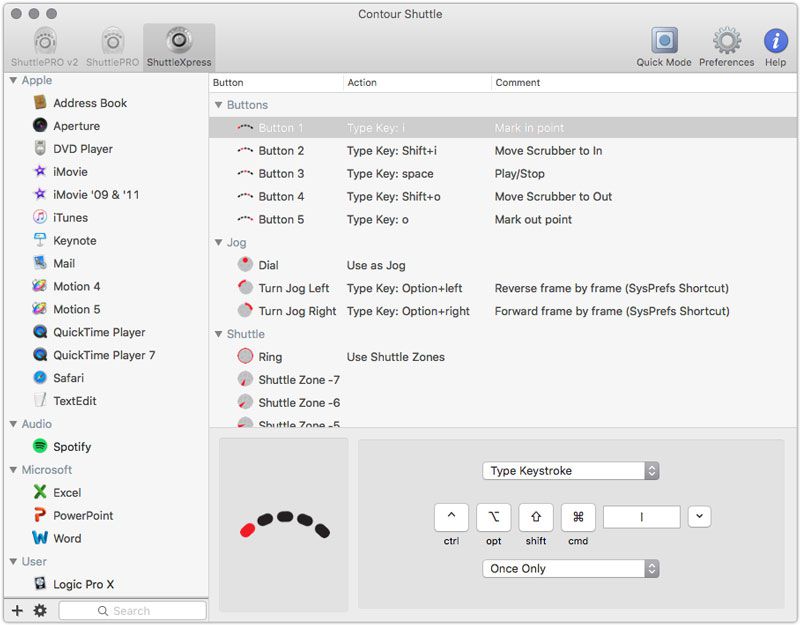
ShuttleXpress
I also use the buttons on my Contour ShuttleXpress for editing (in, out, ripple delete), using the shortcuts listed above:
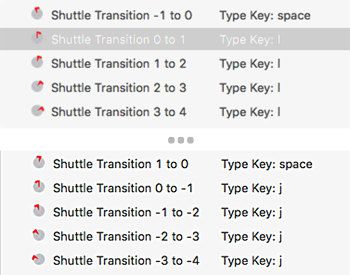
ScreenFlow has scrubbing shortcuts (“l” and “j”), which will rewind and fast forward, speeding up and slowing down incrementally by repeating the keystroke.
For the shuttle wheel on the Xpress it just hits the “l” or “j” key one more time as the zone increases in either direction, and any time it goes back to center it hits space to pause at the current point.
Home and End will navigate to the beginning and end of the project, and page up/page down will zoom the display in and out. There are a ton of shortcuts for almost every feature, so if you use one regularly, look it up in the menu bar and take note of its key combination.
I have a lot more to learn, and I get more proficient with this every time I make one. Feel free to use the comments to add your own favorite tips, whether ScreenFlow-specific or about screencasting in general!
BrettTerpstra.com is a participant in the Amazon Services LLC Associates Program, an affiliate advertising program designed to provide a means to earn fees when linking to Amazon.com and affiliated sites.