Markdown QuickTags is a plugin for WordPress which replaces the HTML editor with a Markdown-enabled set of buttons and features. It can edit Markdown for saving, or render the finished Markdown to HTML, if you prefer. You can preview the rendered HTML at any time, and there’s even a full-screen editing mode. Options can be set in the Settings->Markdown QuickTags panel of your wp-admin section.
Just download and unzip the file, upload the resulting folder to your wp-content/plugins directory and enable the plugin from the Plugins page. You can also upload the plugin using the Upload feature within the Plugins page. Once activated, your HTML editor is automatically replaced.
Requirements
This is currently very beta, and has only been tested on Wordpress 3.0+, and only on Mac. It works in Firefox 4, Safari 5 and Chrome. I doubt it will work in any older browsers, and I really don’t plan to fix that. If you try it in a browser you really think it should work in, get me the details and help me debug it!
Overview
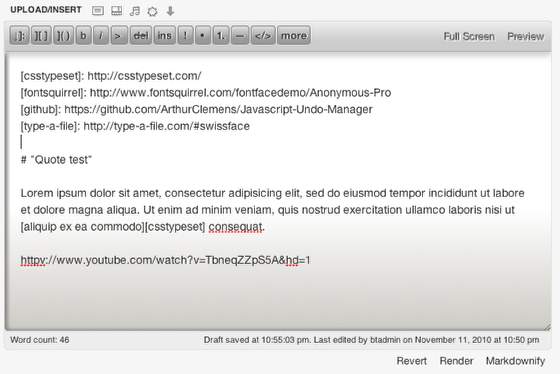
The editor looks a little different, just so you know it’s running. There are some familiar buttons, but they insert Markdown instead of HTML, plus a few new buttons. Also note the Full Screen and Preview links in the upper right, and the Revert, Render and Markdownify links in the lower left.
The Toolbar
Here’s the main part of the toolbar. The b (bold) and i (italics) buttons do what you’d expect, but with Markdown styling. If you use them without selected text, they’ll open the tag, and after you type you can click the same button to put the end of the tag in place.
The “ref link” (]:) and “ref” (] []) buttons are for working with Markdown’s “reference-style” tags. These tags are two parts:
The reference, which looks like: [title]: http://my.url
The link, which uses the title of the reference: [link text][title]
Using the two buttons, you can easily insert references by filling in the popup dialogs or running the commands on selected text. The ref button will look at any selected text and determine if its a url or a title, and will use it as such.
The “>” button just inserts a “> “ at the beginning of the current line or selection, which is Markdown syntax for a blockquote. Blockquotes can be nested by indenting, and the editor will respect current indentation when using this button. “del” and “ins” insert HTML tags, as there’s no equivalent in Markdown, but they’re handy to have.
The “•” (unordered list) and “1.” (ordered list) buttons are greatly improved from the default QuickTags. They’ll remove blank lines in your selection, and will apply the list formatting to every line. If you have an unordered list and you run the ordered list button on it, it will replace the unordered markers with numeric markers. The commands won’t double up list indicators, and they respect indentation. Lists can also be created by selecting text and then pressing “1” (for ordered lists) or any of “*”,”+” or “-“ for an unordered list.
Note: Markdown automatically sets the numerical sequence, no matter what numbers are used. Thus, the editor generally just inserts all 1’s, and lets Markdown figure out the rest.
“—” inserts a Markdown horizontal rule, which is simply - - -. Nothing fancy. “code” wraps the selection in “`” symbols, which will render out to simple <code> tags. You can also create multi-line code blocks by simply indenting the whole block. Since special tab handling in the editor allows you to select a block of text and hit tab to indent the whole thing, no dedicated button is needed for code blocks.
The “more” button inserts the WordPress <!–more–> tag, for page breaks. The “lookup” command (can be shown in the plugin options” looks up your selection in an external website. It’s usually Ask.com, but I like Dictionary.com better, so that’s where it goes now.
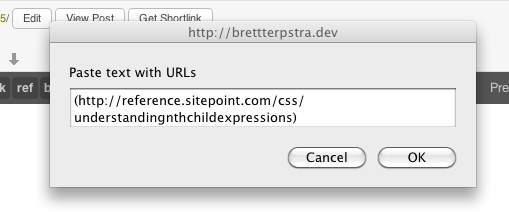
Pasting a List of Urls
The “]:” button, which pops up a dialog for pasting, can actually handle just about any kind of text which contains urls, and it can handle multiple urls. It will extract the links from the text, create a title based on their domain, and insert a list of references for use in your post. The resulting list will be sorted by title, and titles will be unique automatically (it scans the titles it’s creating, as well as existing references in your document).
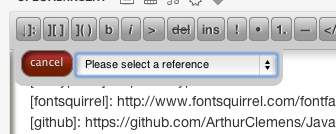
Once you have more than one url, the “][]” button will give you a menu of references to choose from and apply your choice to the selected text.
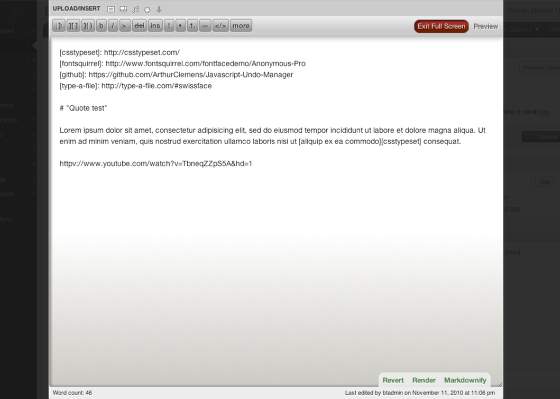
Full Screen Edit Mode
Full screen edit mode not only gives you more space, it disable the scrollbars on the rest of the page, so no more frustration with the whole editor moving around when you scroll off either end. Preview, Render and Markdownify all work in Full screen mode.
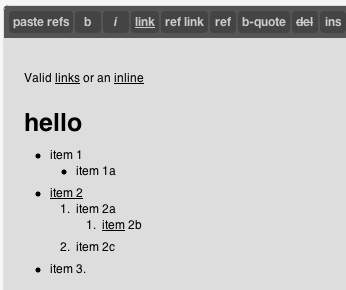
Preview
Click “Preview” in the upper right to change the edit field into a read-only preview of how your Markdown will render. It fully supports Markdown Extra, and SmartyPants is an option in the Settings->Markdown QuickTags menu. In Preview mode, it will also run the default content filters on your text, so you can see the results of most shorttags and plugins. Click the Preview button again (now labeled “Return to editing”) to exit. Preview mode makes no changes to your work.
Help (Markdown reference)
Clicking the question mark in the upper right will provide a Markdown reference. Dismiss it with Escape.
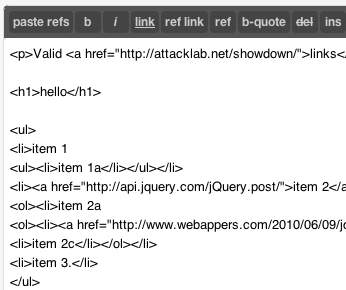
Render and Markdownify
The Render link will process your text in the edit area and change it to rendered HTML. It uses Markdown Extra, but unlike Preview, it doesn’t run the content_filters, keeping any dynamic parts of your post dynamic until they’re displayed. If you have the visual editor enabled, you can switch over at that point and edit in the WYSIWYG version. If you’re using a Markdown Plugin, you don’t need to render.
The Markdownify button does the opposite, taking HTML (either from the WYSIWYG editor, pasted by you, or from a previous post) and turning it into the closest representation of Markdown it can. It works quite well on clean markup, but will run into trouble with anything very complex.
Revert
There’s no complex undo stack, but you can revert to the last “snapshot” with the Revert button, or Command/Control-Z. Snapshots are saved when most buttons are pressed or large edits are made. The Revert button will flash green when a snapshot is saved. This happens automatically. It can be used to undo the Render and Markdownify buttons as well.
Typing in the editor
There are quite a few features in the editor that will manifest themselves as you type.
Auto-pairing
Quotes, brackets and parenthesis are auto-paired, meaning that when you type the left one, the right one is added. If you have text selected when you type a left key of an auto-paired set, the text will be surrounded by the pair, rather than replaced. When you get to the right side of a set, pressing the right item’s key will move the cursor forward rather than doubling the end of the pair.
Tip: With square brackets and parenthesis, creating links manually is a breeze. To link some text to a reference, just highlight the text, then hit “[” twice. The first one will surround the selected text, the next one will insert a pair of square brackets after it, with your cursor in the middle. Then just type or paste the title of the reference, hit “]”, and you’re done. You can create inline links in a very similar fashion, pressing “[” and then “(“, pasting a url, and then pressing “)” or → to end the tag.
Single quotes will only pair if there’s selected text or a blank space or newline to the left, so words like “we’ll” and “don’t” won’t trigger the pairing.
Auto-completion of reference titles
Typing the first character or two of a reference link ([link text][reference title]) will cause Markdown QuickTags to scan your document for existing references and autocomplete your text. You can accept a completion by typing a right arrow or pressing Enter.
List continuation
If you start a list, either with a “1. “ (with any digit) or a *, + or -, pressing enter within or at the end of the line will continue the list with the same delimiter. Pressing enter on an empty list item will remove the delimiter and end the list.
Indentation
The indentation of any line which contains text will be preserved on the next line when Enter is pressed. Pressing Enter again on a blank, indented line will remove the indentation. The Tab key is functional within the editor, and can be used to indent and outdent (with Shift-Tab). You can also select multiple lines of text and indent them all at once with Tab/Shift-Tab.
Command-Enter
Pressing Command-Enter or Control-Enter will skip to the next line without breaking the current line. If this is done inside of a list, the current list and indentation are continued.
Undo/Redo
Bound to Command/Control-Z and Shift-Command/Control-Z, undo and redo stacks will allow up to 100 steps and track all text changes, including copy/paste.
Overriding styles
If there’s a particular style you don’t like in the Markdown QuickTags editor–and you know a little CSS–you can override the default styles by placing a file in your current theme’s directory called ‘mdqtstyle.css’. It will be loaded after the default styles and can override what is found in that stylesheet. You might need to check to see what specificity the current styles have in their declarations, and occasionally need to use !important to override them.
Download
This plugin is in beta. That means there will probably be glitches, and I’d appreciate you letting me know about them!