Marked 2 tips: Document navigation
Another in my irregularly-update series of Marked 2 tips and tricks. There are a lot of document navigation features in Marked, and many that have evolved since the last time I wrote about this. This particular tip is about Marked’s special tools for navigating long documents.
- The table of contents
- Follow scroll
- Inserting a table of contents in the document
- Collapsible sections
- Bookmarks
- The mini map
- Other tools
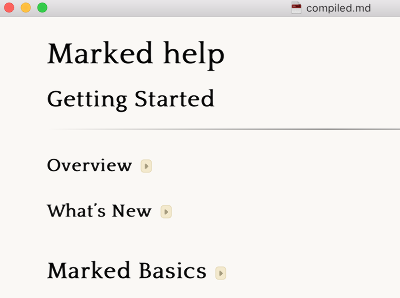
The table of contents
You may already know that while previewing a Markdown document, you can click the “hamburger” icon in the lower right of the preview window status bar to open up a table of contents. More my speed, you can also just hit ⌘T to toggle it. There are some tricks hidden in there…
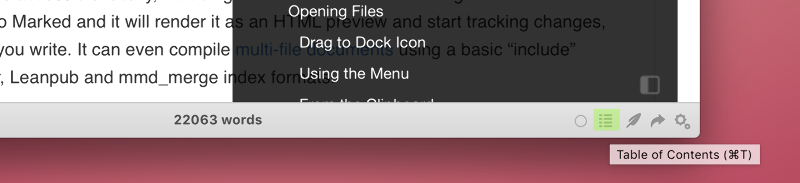
The table of contents is generated automatically from headlines in the document. It won’t show up if there aren’t any headlines. But any number of ATX (#) or Setext (===/---) headlines will create a hierarchical navigation. It’s always best to nest these in order, with only one top level headline (H1), H2 as sections, and then H3 as chapters or subsections, etc.. That’s just good form in general, but it definitely makes navigation easier.
Keyboard nav
Much like the rest of Marked, when the TOC is open, you can use keyboard shortcuts to navigate it. j and k will navigate up and down, and return (or o) will open the highlighted header.
Pressing the Space bar will open up a filter field at the top of the TOC. It’s immediately focused, so you can just type Space and then start typing a search query. This is a fuzzy matching filter, so you can type any part of the headline, even with missing letters, and filter the list to show only matches. Once you see the one you’re looking for, hitting Tab or ctrl-n will jump back to the list so you can select the one you want.
By the way, you can type “?” in any preview window to show available keyboard commands.
Fast search
You can also access the filter directly by hitting f when the TOC isn’t showing. This will pop up the TOC with the filter field focused, and it will hide again as soon as you open a selection.
Follow scroll
In Preferences under the Preview tab, you can enable “Table of contents tracks scroll position.” With this on, the current viewing area is highllighted in the table of contents, moving as you scroll. This also means that if your TOC is long enough to scroll, it will always be scrolled to the same area as your current position in the document.
Inserting a table of contents in the document
You can also manually include a copy of the table of contents in your document using the special syntax <!--TOC-->. You can also define a maximum level like this: <!--TOC max2-->. That would show only the first two levels of headlines in the inserted table of contents. The inserted TOC will also only pick up headlines after the point in the document where it’s placed, so if it comes after, say, a title page, headlines on that page won’t be included in the navigation.
Sadly, Marked is still suffering from the WebKit issue where intra-document links in exported PDFs don’t work, so the clickable TOC isn’t clickable in PDF format. Still working to remedy that one.
Collapsible sections
This isn’t really a Table of Contents feature, but it does relate: if you enable “Headlines collapse sections” in Preferences > Preview, headlines become clickable, collapsing all sections between them and the next headline at the same level (so clicking an H2 would collapse any H3s before the next H2). You can also check the box below the option to require the ⌘ (command) key, which is handy if you find yourself accidentally collapsing headlines. With that enabled, you have to hold down ⌘ when clicking in order to trigger the collapse.
A collapsed section is indicated by a yellow marker on the right of the headline.
You can use the keyboard shortcut ⌘⌥← to collapse all sections, and ⌘⌥→ to expand all. When they’re all collapsed, clicking a headline will uncollapse only that level, so sub-levels within it remain collapsed. Holding down ⌥ (option) when clicking will expand all sub-sections as well. (And same for the reverse, collapsing all subsections.)
In the Table of Contents, collapsed sections are shown as dimmed, but still searchable and selectable. Choosing one in the list will open just that section, allowing you to collapse all, then navigate to just the section you want to work with, even if it’s deeply nested.
Coming soon
The next update to Marked includes the ability to fix the table of contents to the left side. This happens automatically when you switch to full screen mode, but it can be toggled on and off manually at any time. More details to come!
Bookmarks
Bookmarks are used when reviewing and working with long documents. They only last for the life of the session, and aren’t saved along with the document itself. You can set up to 9 of them in the document, and then quickly navigate just by typing the associated numbers.
Typing ⌥1 (Option-1) in your document will place the first bookmark at an offset based on the nearest headline. This means that the bookmark will still work even if the length or ordering of elements changes. You can also type ⇧1 to set a more literal, position-based bookmark, but I’d recommend always using the newer headline proximity system you get with the ⌥ bookmarks.
Now you can just type the number 1 to jump to that bookmark. You can also navigate through bookmarks using n and p. n will go to the next bookmark in positioning order, p to the previous. Using Shift with them (N and P) will navigate them in numerical order.
Add additional bookmarks using ⌥2--9. Using and existing number elsewhere in the document will replace that bookmark position with the new one. Use xx (type “x” twice) to clear all bookmarks.
You can also navigate bookmarks with the mouse. Bookmarks will show on the right side of the preview. They’re positioned within the viewing area spaced relative to their position in the document. Hovering over them will reveal more information, and clicking the markers will jump to that spot.
The mini map
Typing 0 (the number zero) will expand the bookmarks. If you’ve enabled “Mini Map navigation” in Preferences > Preview, it will also open the minimap. Note that the map is only created on documents that are at least 3 pages long at the current viewing width. The map is an image of the entire document, at the proportions created by the current preview window size. It slides out from the right, offering an overview of your document on one screen. Click anywhere on the mini map to jump to that point in the document. If you hold down ⌘ while hovering, it will magnify the area under the cursor, and holding down ⌥ will “scrub” the document, moving the scroll position relative to the mouse as you move over the map.

The mini map can have trouble on very large documents, which is a bummer because that’s when it’s the handiest. I’m working out a few issues on that.
Other tools
I should also mention Autoscroll, and handy feature for those who are reviewing and performing editorial tasks on documents, or using Marked for reading long-form texts. You can find more information on Autoscroll in the documentation, but the short version is: just type s to start scrolling, and use ⇧←/→ to speed up and slow down. Escape will end autoscrolling.
If all of this sounds titillating and you’re not a Marked user, go grab a copy. The next big update is right around the corner!

Brett is a writer and developer living in Minnesota, USA. You can follow him as ttscoff on Twitter, GitHub, and Mastodon. Sign up for the email newsletter, and keep up with this blog by adding it to your favorite news reader.